Battery switch on travel trailer function is crucial for managing your RV’s power. Understanding how this simple yet vital component works is key to preventing dead batteries and ensuring a smooth camping experience. This guide breaks down everything you need to know about your travel trailer’s battery switch, from its various types and functions to troubleshooting common issues and performing essential maintenance.
We’ll cover safe battery connection and disconnection procedures, and explore how to minimize battery drain. Let’s dive in!
We’ll explore different battery switch types, their pros and cons, and how they interact with your trailer’s electrical system and your tow vehicle’s charging system. We’ll also tackle practical troubleshooting steps, provide safety tips, and offer a maintenance schedule to keep your system running smoothly for years to come. By the end, you’ll be confident in managing your travel trailer’s power and preventing costly battery problems.
Battery Switch Types in Travel Trailers
Choosing the right battery switch for your travel trailer is crucial for managing your power sources efficiently and safely. Different types of switches offer varying levels of control and protection, so understanding their differences is key to making an informed decision. This section will detail the common types of battery switches found in travel trailers and compare their features.
Single-Pole Battery Switches, Battery switch on travel trailer function
Single-pole switches are the simplest type. They offer a single ON/OFF function, connecting either your house batteries or your tow vehicle’s charging system to the trailer’s electrical system. This means you can only power the trailer from one source at a time – either the house batteries or the charging system. They are inexpensive and easy to install, but their limited functionality makes them less desirable for those who need more control over their power sources.
For example, you couldn’t charge your house batteries while simultaneously running appliances off them with this type of switch.
Double-Pole Battery Switches
Double-pole switches provide a more advanced level of control. They allow you to isolate both the positive and negative terminals of your house battery bank, providing a safer disconnect when servicing or storing your trailer. This added safety feature is a significant advantage over single-pole switches. However, they still only allow you to use one power source at a time.
They’re more expensive than single-pole switches, but the enhanced safety justifies the cost for many RVers.
Double-Pole Double-Throw (DPDT) Battery Switches
DPDT switches offer the most versatility. These switches allow you to connect either your house batteries, your tow vehicle’s charging system, or both simultaneously to the trailer’s electrical system. This is incredibly useful for charging your house batteries while running appliances. They offer the ultimate in control and flexibility, enabling efficient power management. The added complexity, however, results in a higher cost and slightly more complex installation compared to simpler switches.
Comparison of Battery Switch Types
| Feature | Single-Pole | Double-Pole | Double-Pole Double-Throw (DPDT) |
|---|---|---|---|
| Number of Poles | 1 | 2 | 2 |
| Number of Throws | 1 | 1 | 2 |
| Simultaneous Power Sources | No | No | Yes |
| Safety Features | Limited | Improved (battery isolation) | Improved (battery isolation and source selection) |
| Cost | Low | Medium | High |
| Typical Applications | Basic power switching | Improved safety for battery disconnection | Charging and running appliances simultaneously |
Understanding the Function of the Battery Switch
The battery switch in your travel trailer is a crucial component of its electrical system, acting as a gatekeeper for power flow between your house batteries and your tow vehicle’s charging system. It allows you to control when your house batteries are connected to the charging source, protecting them from overcharging or draining the tow vehicle’s battery. Understanding its function is key to maintaining your trailer’s electrical system and ensuring reliable power for your adventures.The battery switch isolates the house batteries from the tow vehicle’s charging system primarily to prevent unwanted battery drain.
If the house batteries are constantly connected, even when the trailer isn’t hooked up to the tow vehicle, they can slowly discharge, potentially leaving you with dead batteries when you’re ready to go camping. The switch allows you to disconnect the house batteries completely, preserving their charge until needed. This isolation also protects the tow vehicle’s battery from potential overload if there’s a problem with the trailer’s electrical system.
Battery Switch Operation
Properly switching between house batteries and tow vehicle charging involves a simple, yet important, procedure. First, ensure that the switch is in the “OFF” position before disconnecting from your tow vehicle. This prevents any accidental backfeeding of power. When connecting to your tow vehicle, turn the switch to the “ON” position to allow the tow vehicle’s charging system to replenish the house batteries.
Once disconnected from the tow vehicle, return the switch to the “OFF” position to prevent draining of the house batteries. Some switches offer a third position, often labeled “Both,” which connects both the house batteries and the tow vehicle battery. This is typically used when running appliances requiring significant power, ensuring sufficient capacity. Always refer to your specific trailer’s manual for the correct operation of its battery switch.
Improper use could damage your batteries or other electrical components.
Troubleshooting Common Battery Switch Issues
Your travel trailer’s battery switch is a crucial component, and problems with it can leave you stranded. Understanding common issues and how to troubleshoot them is essential for maintaining your RV’s power system. This section will guide you through identifying and resolving some of the most frequent problems.Common battery switch problems usually stem from corrosion, loose connections, or outright switch failure.
Corrosion builds up over time due to exposure to the elements and can significantly impede electrical conductivity. Loose connections, often caused by vibration during travel, lead to intermittent power or complete failure. Finally, the switch itself can simply wear out from repeated use.
Identifying Common Problems
Identifying the source of the problem is the first step to fixing it. Visually inspect the switch for signs of corrosion, which typically appears as a whitish-green or bluish-green buildup on the terminals and switch body. Carefully examine the wiring connections for looseness or damage. A loose connection might show signs of wear or discoloration at the point of contact.
If the switch feels loose in its housing or the switch mechanism itself feels stiff or unresponsive, switch failure is a likely culprit.
Troubleshooting Steps for Resolving Common Battery Switch Problems
Once you’ve identified the problem, you can take steps to resolve it. Corrosion can be cleaned using a wire brush and a battery terminal cleaner. Be sure to disconnect the battery before cleaning. For loose connections, tighten the terminal screws securely. If the wires themselves are damaged, they will need to be replaced.
If the switch is faulty, it must be replaced entirely. Remember to always disconnect the battery before working on any electrical components.
Inspecting and Testing a Battery Switch
A safe and systematic inspection is crucial for diagnosing battery switch issues. Follow these steps:
- Disconnect the Battery: Before starting any inspection or testing, always disconnect the negative (-) battery terminal to prevent accidental shorts or shocks.
- Visual Inspection: Carefully examine the switch for any signs of corrosion, damage, or looseness. Look closely at the terminals and wiring connections.
- Check Connections: Tighten any loose terminal screws. If the wires are corroded or damaged, replace them.
- Test Switch Functionality (If Possible): With the battery disconnected, carefully use a multimeter to test continuity across the switch terminals. This will confirm if the switch is correctly making and breaking the circuit. (Note: This step requires basic electrical knowledge and the use of a multimeter.)
- Reconnect the Battery: After completing the inspection and any necessary repairs, reconnect the negative (-) battery terminal and then the positive (+) terminal.
- Test System Functionality: Check all 12V systems in your trailer to ensure that the battery switch is now functioning correctly.
Connecting and Disconnecting Batteries Safely
Connecting and disconnecting your travel trailer’s batteries might seem straightforward, but improper handling can lead to serious consequences, including electrical shocks, burns, and even battery explosions. This section Artikels the correct procedures and crucial safety measures to ensure a smooth and safe process. Always prioritize safety when working with batteries.Proper battery connection and disconnection involves a methodical approach, using the correct tools and observing vital safety precautions.
So, you’re hitting the road in your travel trailer? Awesome! First things first: make sure you understand your battery switch on travel trailer function – it’s crucial for keeping your lights and appliances running. Once you’ve got that sorted, think about your entertainment. For a truly immersive experience, check out this guide on audiophile travel aetup to elevate your road trip tunes to the next level.
Proper power management and great sound – the perfect recipe for an epic adventure!
Failing to do so can result in damage to your equipment or, more seriously, personal injury. The steps below detail the correct process.
Battery Disconnection Procedure
Before beginning any work on your travel trailer’s electrical system, always ensure the main power switch is OFF. This prevents accidental short circuits and protects you from electrical shocks. Then, locate your battery switch; it’s usually clearly labeled and easily accessible. Next, follow these steps:
- Wear appropriate safety gear, including safety glasses and gloves. Gloves protect your hands from corrosive battery acid and potential cuts from battery terminals.
- Use a wrench or socket of the correct size to loosen the negative (-) terminal connection first. This is crucial to prevent accidental short circuits. Never work on the positive (+) terminal first.
- Carefully remove the negative (-) cable clamp from the terminal. Set the cable aside, ensuring it doesn’t come into contact with any metal parts of the trailer.
- Repeat steps 2 and 3 for the positive (+) terminal.
- Store the battery cables neatly to prevent accidental contact or damage.
Battery Connection Procedure
Connecting the batteries follows a similar process, but in reverse order, prioritizing safety at every step.
- Again, ensure the main power switch is OFF before beginning.
- Don your safety glasses and gloves.
- Attach the positive (+) cable clamp to the positive (+) terminal securely, using the appropriate wrench or socket. Ensure a firm connection to prevent voltage drop.
- Attach the negative (-) cable clamp to the negative (-) terminal. Again, ensure a tight connection.
- Double-check all connections for tightness and proper seating. Loose connections can lead to overheating and potential fire hazards.
- After ensuring all connections are secure, you can turn the main power switch ON.
Safety Precautions and Equipment
Working with car batteries always involves a risk of acid burns and electrical shocks. Taking precautions minimizes these risks significantly.
- Always wear safety glasses to protect your eyes from splashing battery acid.
- Use insulated gloves to protect your hands from electrical shocks and corrosive battery acid. Rubber gloves are recommended.
- Have baking soda and water readily available to neutralize any spilled battery acid. Immediately flush any affected skin area with plenty of water if acid comes into contact with your skin.
- Work in a well-ventilated area. Battery fumes are toxic and can be harmful if inhaled.
- Never wear loose clothing or jewelry that could get caught in moving parts or come into contact with battery terminals.
- If you are unsure about any aspect of the process, consult a qualified professional.
Maintaining the Battery Switch and Connections
Keeping your travel trailer’s battery switch and connections in top shape is crucial for reliable power and preventing costly repairs. Regular maintenance prevents corrosion buildup, ensuring a consistent flow of electricity to your appliances and preventing premature battery failure. Neglecting this can lead to poor performance, starting issues, and even potential fire hazards.A proactive maintenance schedule will significantly extend the lifespan of your battery system and minimize downtime.
Battery Switch and Wiring Maintenance Schedule
A simple yearly inspection, coupled with more thorough cleaning every two years, is a good starting point. More frequent checks might be necessary in particularly harsh environments (coastal areas with high salinity, for example) or if you notice any signs of corrosion. The following schedule provides a practical guideline:
- Yearly Inspection: Visually inspect the battery switch, wiring, and terminals for any signs of damage, looseness, or corrosion. Check for any frayed wires, loose connections, or signs of overheating. Tighten any loose connections.
- Bi-Annual Cleaning: Thoroughly clean the battery terminals and switch contacts to remove any corrosion. This typically involves using a wire brush, baking soda paste, and a terminal cleaning solution (more details below).
- Every Three Years: Consider replacing the battery switch if you notice any signs of wear and tear, such as difficulty in switching positions or significant corrosion. Also, inspect all wiring for brittleness or damage and replace any compromised sections.
Cleaning Corrosion from Battery Terminals and Switch Contacts
Corrosion significantly impedes electrical conductivity, leading to poor performance and potential damage. Here’s how to effectively clean your battery system:
- Disconnect the Batteries: Always disconnect the negative (-) battery terminal first, then the positive (+) terminal. This prevents accidental short circuits.
- Prepare Cleaning Solution: A paste of baking soda and water is an effective and safe cleaner. Alternatively, a commercially available battery terminal cleaner can be used.
- Clean the Terminals: Use a wire brush to scrub away loose corrosion from both the battery terminals and the switch contacts. Ensure you remove all loose debris. Apply the baking soda paste and let it sit for a few minutes to help break down stubborn corrosion. Then scrub again with the wire brush and rinse with clean water.
- Clean the Switch Contacts: Use a small brush or cotton swab to carefully clean the contacts within the battery switch itself. Be gentle to avoid damaging the switch mechanism.
- Apply Anti-Corrosion Product: Once everything is clean and dry, apply a dielectric grease or anti-corrosion spray to the terminals and contacts to prevent future corrosion.
- Reconnect the Batteries: Reconnect the positive (+) terminal first, then the negative (-) terminal. Ensure the connections are tight and secure.
Importance of Using Anti-Corrosion Products
Anti-corrosion products are not merely optional; they’re essential for long-term protection of your battery system. These products create a barrier between the metal surfaces, preventing moisture and oxygen from causing corrosion. This translates to better electrical conductivity, preventing voltage drops and extending the life of your batteries and switch. Common examples include dielectric grease, which is excellent for preventing corrosion on terminals, and anti-corrosion sprays that provide a protective coating on metal surfaces.
So, you’re prepping for your next adventure? Awesome! First things first: make sure your travel trailer’s power is sorted. Understanding the battery switch on travel trailer function is key to avoiding dead batteries and a frustrating trip. Once that’s handled, let’s talk tunes! For the serious music lover, check out this guide on creating an amazing audiophile travel setup – because good sound makes any journey better.
Regular application significantly reduces the frequency of cleaning and minimizes the risk of electrical issues.
Battery Switch and its Role in Preventing Battery Drain
Your travel trailer’s battery switch is a crucial component for preserving your battery’s charge and preventing unexpected dead batteries. Essentially, it acts as a master on/off switch for your trailer’s electrical system, allowing you to completely disconnect the batteries when not in use. This prevents the slow, but steady, drain that can occur even when your trailer is parked.The battery switch plays a vital role in combating parasitic drain, the small but constant electrical draw from various systems within your trailer even when they’re not actively in use.
Things like clocks, carbon monoxide detectors, and even some control modules draw a tiny amount of power all the time. Over several weeks or months, this small drain can completely deplete your battery, leaving you with a frustrating dead battery when you’re ready to hit the road. By switching the battery off, you eliminate this parasitic drain, ensuring your battery remains charged until your next trip.
Minimizing Battery Drain with the Battery Switch Off
Completely disconnecting your batteries using the battery switch is the most effective way to prevent parasitic drain. However, some minimal drain might still occur through very small leaks in the system. To minimize this further, consider these steps:
First, ensure all appliances and electronics are turned off. This includes interior lights, refrigerators, water pumps, and any other devices that draw power. Don’t rely solely on the switch on the appliance itself; some devices might have a small power draw even when “off”.
Second, disconnect any devices that draw power even when switched off. For example, some radios or GPS systems might still maintain a connection or draw a small current to retain memory. Unplugging these devices completely eliminates this drain. This might involve unplugging from 12V outlets or disconnecting them from their wiring harnesses.
Finally, consider the age and condition of your batteries. Older batteries or those in poor condition might experience a higher rate of self-discharge, even when disconnected. Regular battery maintenance, including testing and potentially replacing aging batteries, is important for maximizing battery life and minimizing unwanted drain.
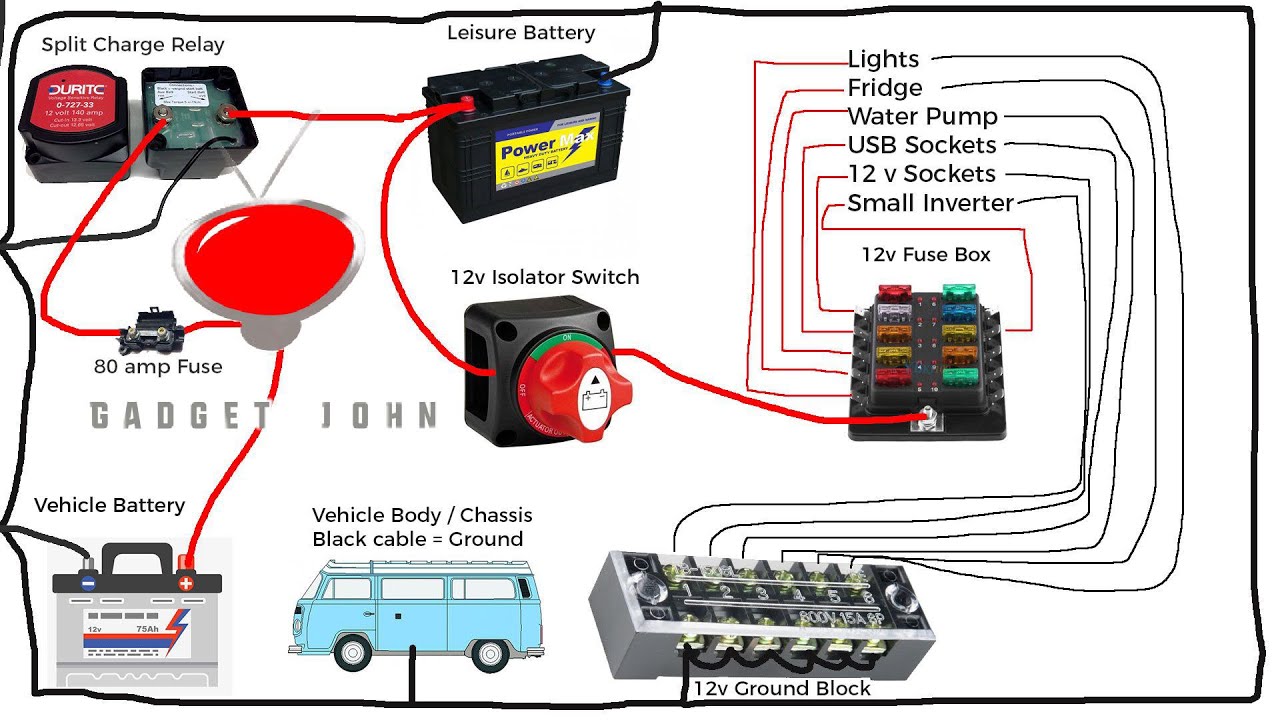
Visual Representation of a Battery Switch Installation: Battery Switch On Travel Trailer Function
Understanding the physical layout of a battery switch in your travel trailer is crucial for both safe operation and effective troubleshooting. This section provides a visual description of a typical installation, focusing on wiring and location.
The battery switch is usually located in a readily accessible location near the batteries themselves, often within a dedicated battery compartment. This compartment is typically situated at the tongue of the trailer or in a side compartment, depending on the trailer’s design. Accessibility is key for easy switching and inspection. Think of it like the main power switch for your trailer’s house system; you need to get to it quickly and easily.
Battery Switch Location and Accessibility
The ideal location minimizes wiring length and maximizes ease of access. You’ll want to be able to reach the switch without having to crawl under the trailer or remove significant components. In many cases, the switch is mounted on a panel with other electrical components, such as circuit breakers or fuses. Sometimes, it’s even located inside a weatherproof box for added protection from the elements.
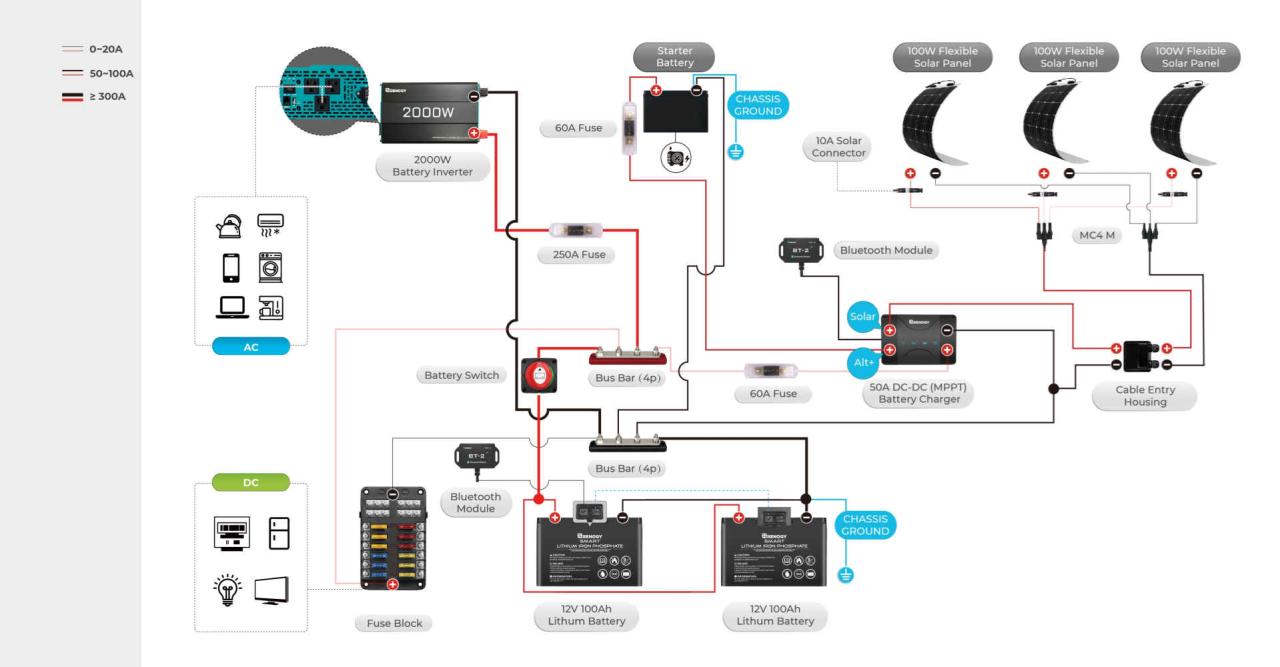
Typical Wiring Diagram and Connections
A typical battery switch installation involves several key connections. The switch itself will have several terminals, usually three or more, depending on the switch type. One terminal connects to the positive (+) terminal of your main house battery. Another terminal connects to the positive (+) terminal of the auxiliary battery (if present). A third terminal connects to the positive (+) wire leading to your trailer’s 12V DC system.
Negative (-) connections are typically made directly to the battery and chassis, bypassing the switch for safety reasons. The diagram below describes a common setup.
Imagine a simple diagram: The main house battery’s positive (+) terminal is connected to one terminal of the switch. A second terminal on the switch connects to the positive (+) terminal of the auxiliary battery (if installed). A third terminal on the switch connects to the positive (+) cable supplying power to the trailer’s 12V system (lights, water pump, etc.).
A thick, heavy-gauge wire connects the negative (-) terminals of both batteries directly to the trailer’s chassis (ground). This ground connection is crucial for completing the electrical circuit and ensuring proper operation.
Understanding the Wiring Diagram
The wiring diagram itself will vary slightly depending on the specific switch and trailer configuration. However, the fundamental principle remains the same: the switch controls the positive (+) path to the trailer’s 12V system. Always consult the wiring diagram provided with your specific battery switch and trailer. Accurate wiring is essential for safe and reliable operation.
Mastering your travel trailer’s battery switch is a simple yet powerful way to extend the life of your batteries and prevent frustrating power outages. By understanding the different types of switches, their functions, and proper maintenance procedures, you can ensure your RV is always ready for your next adventure. Remember to always prioritize safety when working with batteries and electrical systems.
Happy travels!
Key Questions Answered
What happens if my battery switch is left in the “off” position?
Leaving the switch off completely isolates the house batteries, preventing any drain from lights or appliances left unintentionally on. However, it also prevents charging from the tow vehicle.
How often should I clean my battery terminals and switch contacts?
At least twice a year, or more often if you notice corrosion buildup. Spring and fall are good times.
Can I use a different type of battery switch than what came with my trailer?
Potentially, but ensure the amperage rating is sufficient for your system. Consult a qualified RV technician for guidance.
What causes parasitic drain in my RV’s battery system?
Parasitic drain is caused by small, continuous draws from devices that remain active even when the trailer is off. This can be from faulty appliances, poorly wired circuits, or even a low-power draw from a constantly running device like a clock.
